本次实验,使用的是:Ubuntu 18.04 server、dpdk-19.11.8、pktgen-dpdk-pktgen-20.03.0(注意版本一致,编译也不一致)
上传dpdk-19.11.8.tar.xz,和pktgen-dpdk-pktgen-20.03.0.tar.xz 到 /home/User 目录下
sudo -i                                            #使用root
apt update                                          #更新软件列表
apt install libpcap-dev make gcc libnuma-dev python -y     #安装依赖包
cd /home/user                                       #转到dpdk-19.11.8.tar.xz上传目录
tar xf dpdk-19.11.8.tar.xz                          #解压dpdk-19.11.8.tar.xz
cd dpdk-stable-19.11.8/                             #进入dpdk-19.11.8 目录
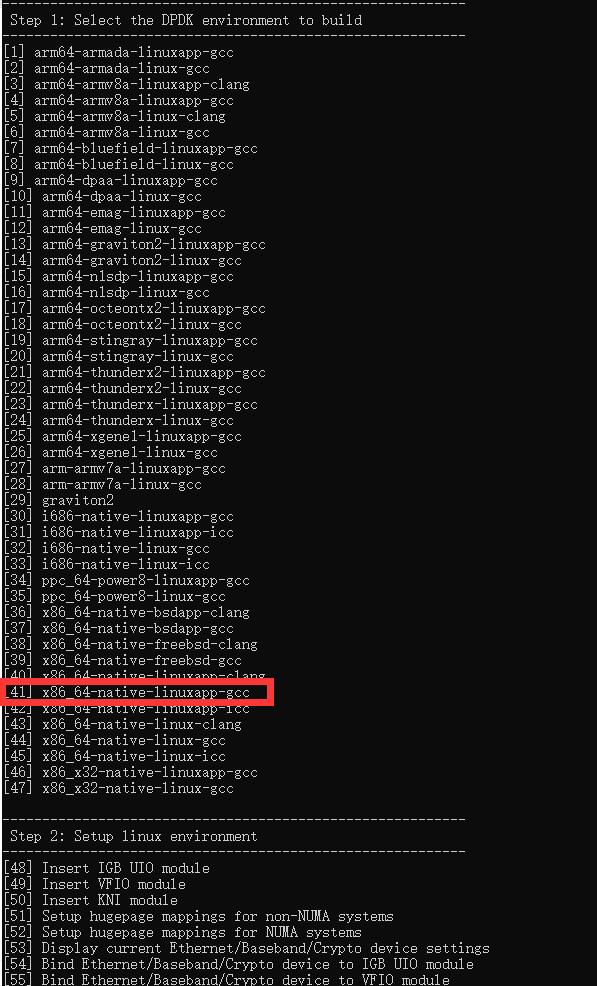
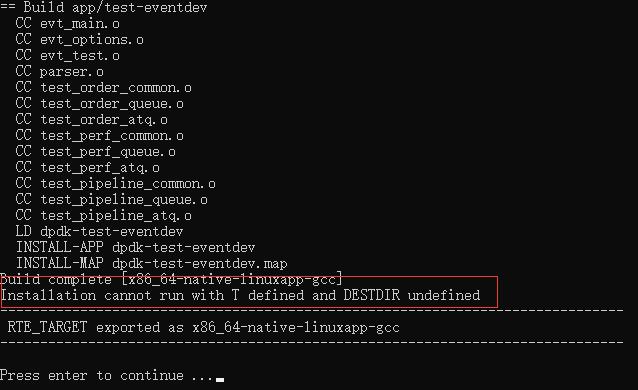
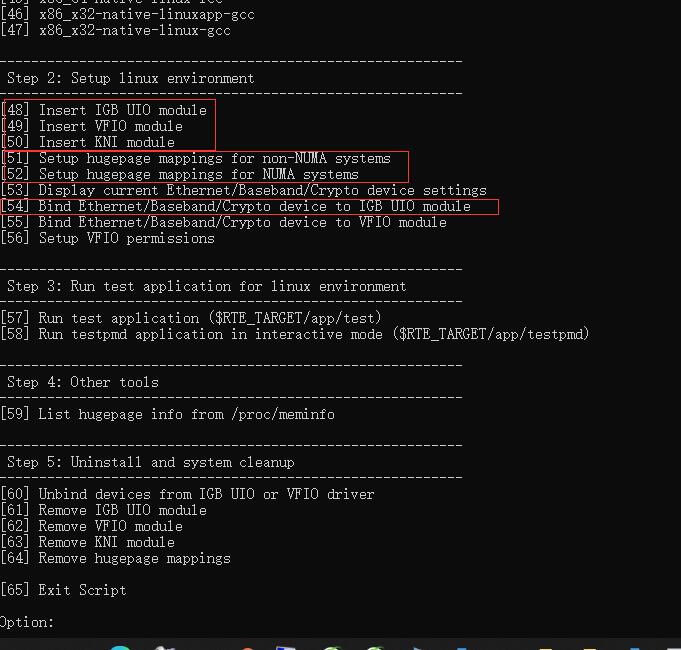
./usertools/dpdk-setup.sh                           #执行DPDK配置程序


apt install pkg-config liblua5.3-dev -y
cd /home/user
tar xf pktgen-dpdk-pktgen-19.12.0.tar.xz
cd pktgen-dpdk-pktgen-19.12.0/
export RTE_SDK=/home/user/dpdk-stable-19.11.8/
export RTE_TARGET=x86_64-native-linuxapp-gcc
make
./app/x86_64-native-linuxapp-gcc/pktgen  -c 0xf -n 3 --proc-type auto --socket-mem 512    -- -P -T -m "[1:2].0, [3:4].1"
 ./app/x86_64-native-linuxapp-gcc/pktgen  -c 0xfffff -n 3 --proc-type auto --socket-mem 512    -- -P -T -m "[1-8].0, [9-17].1"   (20核心)
#可以使用命令:
Pktgen:/> start all
Pktgen:/> stop all

基本命令:
set 0 count 100
 设置端口0 发送报文数量100
set 0 size 64
   设置端口0 发送报文大小64
set 0 rate 50
   设置端口0 发送报文速率百分比50
set 0 src ip 10.0.0.0/24
  设置端口0 源IP地址:10.0.0.0/24

set 0 src mac aa:bb:cc:dd:ee:ff
  设置端口0 源MAC地址:aa:bb:cc:dd:ee:ff
start 0
   端口0开始发送
stop 0
    端口0停止发送

set 0 dst ip 192.168.74.132
         设置端口0 目的地IP
set 0 dst mac 00:0c:29:45:e2:b9     设置端口0 目的地MAC


Pktgen:/> set 0 src ip 10.0.0.2/24              # 虚拟一个与6wind ens3 同网段的ip地址
Pktgen:/> set 0 src mac 90:e2:ba:f7:58:58       # dpdkgen p0 mac 地址
Pktgen:/> set 0 dst ip 20.0.0.2                 # 虚拟一个与6wind ens7 同网段的ip地址,注意做arp配置
Pktgen:/> set 0 dst mac 90:e2:ba:f7:53:10       # 6wind ens3 mac 地址
Pktgen:/> set 0 proto udp                       # 配置64字节udp数据包
Pktgen:/> set 0 size 64
Pktgen:/> start 0
///////////////////////////////////////////////
 ./app/x86_64-native-linuxapp-gcc/pktgen  -c 0xff -n 3 --proc-type auto --socket-mem 512    -- -P -T -m "[1-2:4].0, [5-7].1"
手动命令
echo 1 > /sys/module/vfio/parameters/enable_unsafe_noiommu_mode
echo 512 > /sys/kernel/mm/hugepages/hugepages-2048kB/nr_hugepages
加载uio_pci_generic功能
sudo modprobe uio_pci_generic
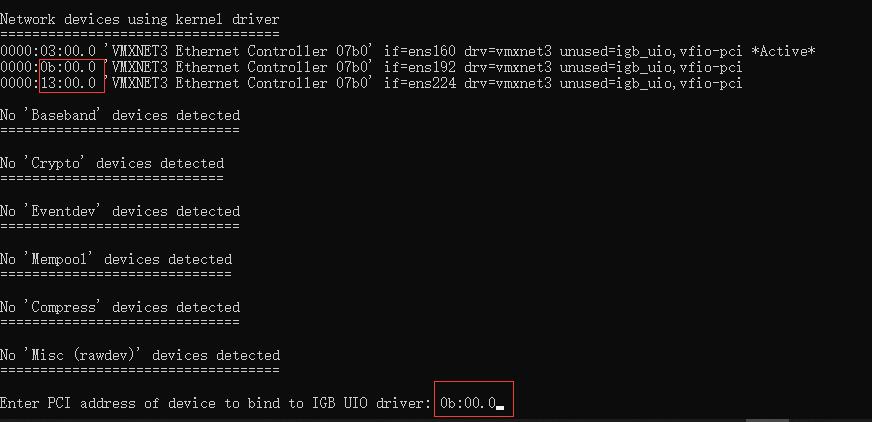
将enp0s8,也就是00:08.0绑定到uio_pci_generic下:
./dpdk-devbind.py --bind=uio_pci_generic 00:08.0
./dpdk-devbind.py --status查看网卡设备状态
EAL命令行选项:
$ pktgen -l 0-4 -n 3 – -P -m “[1:3].0, [2:4].1  一条常见的Pktgen命令
Pktgen命令常用的参数选项:
$ pktgen -c COREMASK -n NUM \
             [-m NB] \
             [-r NUM] \
             [-b <domain:bus:devid.func>] \
             [--proc-type primary|secondary|auto] -- [pktgen options]

  -c COREMASK         : A hexadecimal bitmask of cores to run on
  -n NUM              : Number of memory channels
  -v                  : Display version information on startup
  -d LIB.so           : Add driver (can be used multiple times)
  -m MB               : Memory to allocate (see also --socket-mem)
  -r NUM              : Force number of memory ranks (don't detect)
  --xen-dom0          : Support application running on Xen Domain0 without
                        hugetlbfs
  --syslog            : Set syslog facility
  --socket-mem        : Memory to allocate on specific
                        sockets (use comma separated values)
  --huge-dir          : Directory where hugetlbfs is mounted
  --proc-type         : Type of this process
  --file-prefix       : Prefix for hugepage filenames
  --pci-blacklist, -b : Add a PCI device in black list.
                        Prevent EAL from using this PCI device. The argument
                        format is <domain:bus:devid.func>.
  --pci-whitelist, -w : Add a PCI device in white list.
                        Only use the specified PCI devices. The argument
                        format is <[domain:]bus:devid.func>. This option
                        can be present several times (once per device).
                        NOTE: PCI whitelist cannot be used with -b option
  --vdev              : Add a virtual device.
                        The argument format is <driver><id>[,key=val,...]
                        (ex: --vdev=eth_pcap0,iface=eth2).
  --vmware-tsc-map    : Use VMware TSC map instead of native RDTSC
  --base-virtaddr     : Specify base virtual address
  --vfio-intr         : Specify desired interrupt mode for VFIO
                        (legacy|msi|msix)
  --create-uio-dev    : Create /dev/uioX (usually done by hotplug)

EAL options for DEBUG use only:
  --no-huge           : Use malloc instead of hugetlbfs
  --no-pci            : Disable pci
  --no-hpet           : Disable hpet
  --no-shconf         : No shared config (mmap'd files)

-l:代表使用的核心
-w:指定网口,PCI的ID号
例如3b:00.0
-c COREMASK:16进制掩码设置应用程序使用哪些cpu核,eg:-c 3, 3代表的是十六进制0x03,它的二进制是11,假如服务器有8个cpu核,二进制11写成00000011,从右到左依次代表核0-7,11设置使用0和1号核
注意:core编号在不同的平台不一样,需要事先确定好
-n NUM:设置每个处理器socket的内存通道数,也就是服务器内存通道数,一般是4、6或者8通道等
-v:展示版本信息
-d LIB.so:加载额外驱动,参数可以是一个驱动文件或是包含多个驱动文件的文件夹。可以使用多个-d选项
-m MB:设置启动时与分配存储数量
-r NUM:设置内存ranks数(默认自动检测)
--xen-dom0:支持在Xen Domain0上运行,而无需大页
--syslog:设置日志设备
--socket-mem:预分配每个socket内存大小,可以理解为给每个发包进程使用的内存大页大小
参数用逗号分隔列表值,例如:--socket-mem 1024,2048,意思是在0号socket上预分配1024M,在1号socket上分配2048M
--huge-dir:使用指定的hugetlbfs目录而不是自动检测的。hugetlbfs 是大页使用目录
--proc-type:设置当前进程类型
--file-prefix:为一个DPDK进程设置一个不同的共享文件前缀。使用多个不同的前缀文件允许运行多个独立的dpdk进程组。dpdk支持多进程协同完成工作,多进程使用相同的共享文件组成进程组(进程组里的进程分为primary和secondary),也就是区分每个不同发包进程内存大页空间
--pci-blacklist, -b:EAL不会使用黑名单中的pci设备,可以使用多个-b参数
--pci-whitelist, -w:添加一个pci设备到白名单中
注意:一次只能使用-b和-w中的一个参数
--vdev:添加一个虚拟设备
--vmware-tsc-map:使用VMware TSC map而不是本地RDTSC
--base-virtaddr:DPDK的primary进程尝试使用一个不同的内存映射开始地址。 对于因为地址映射冲突而不能启动的secondary 进程非常有用
--vfio-intr:为绑定到VFIO内核驱动的设备指定中断模式
--create-uio-dev:为设备创建/dev/uioX 文件并绑定的igb_uio内核驱动(通常由ifb_uio驱动自己完成)

一些DPDK的调试参数选项:
--no-huge:使用匿名存储而不是大页(暗指不支持多进程)
--no-pci:禁止pci总线
--no-hpet:禁止使用HPET定时器
--no-shconf:不创建共享文件(暗指不支持多进程)
-c COREMASK 和 -n NUM 参数是必需的。其他参数是可选的,Pktgen需要2个逻辑核心(lcore)才能运行

下面我们来看一个完成的启动Pktgen的例子:
$ pktgen -l 0-4 -n 3 --proc-type auto --socket-mem 256,256
             -b 0000:03:00.0 -b 0000:03:00.1 \
              --file-prefix pg \
             -- -P -m "[1:3].0, [2:4].1
这里使用到的几个EAL参数:
-n 3:表示每个处理器socket拥有三个内存通道
--proc-type auto:自动设置当前进程类型
--socket-mem 256,256:在0号socket上预分配256M内存大小,在1号socket上预分配256M
--file-prefix pg:为一个DPDK进程设置一个pg的共享文件前缀
Pktgen命令行选项
help 获得帮助

page 显示不同的屏幕
      [0-7]:可以展示不同端口的页面,
      main:展示程序运行的主页面
      range:展示设置生成包各类参数的页面,可以查看各个端口设置包的参数
      config|cfg:显示配置页面
      pcap:展示配置pcap包的页面(如果制定了pcap文件的话)
      cpu:显示有关CPU系统的一些信息
      next:显示PCAP数据包的下一页
      sequence | seq:序列将显示给定端口的一组数据包
      格式prot <number>
      rnd:显示给定端口的数据包的随机位域
      格式prot <number>
      log:显示日志消息页面
      latency:显示时间延迟页面
      states:显示所有物理端口的统计信息
      xstates:显示每个端口的扩展统计信息

enable/disable     开启或者关闭指定端口的功能
$ enable|disable <portlist> <features>
enable|disable <portlist> <features>
    Feature - process              - Enable or Disable processing of ARP/ICMP/IPv4/IPv6 packets
              mpls                 - Enable/disable sending MPLS entry in packets
              qinq                 - Enable/disable sending Q-in-Q header in packets
              gre                  - Enable/disable GRE support
              gre_eth              - Enable/disable GRE with Ethernet frame payload
              vlan                 - Enable/disable VLAN tagging
              garp                 - Enable or Disable Gratuitous ARP packet processing
              random               - Enable/disable Random packet support
              latency              - Enable/disable latency testing
              pcap                 - Enable or Disable sending pcap packets on a portlist
              blink                - Blink LED on port(s)
              rx_tap               - Enable/Disable RX Tap support
              tx_tap               - Enable/Disable TX Tap support
              icmp                 - Enable/Disable sending ICMP packets
              range                - Enable or Disable the given portlist for sending a range of packets
              capture              - Enable/disable packet capturing on a portlist
              bonding              - Enable call TX with zero packets for bonding driver
              short                - Allow shorter then 64 byte frames to be sent
              vxlan                - Send VxLAN packets

enable|disable screen              - Enable/disable updating the screen and unlock/lock window
               mac_from_arp        - Enable/disable MAC address from ARP packet
off                                - screen off shortcut
on                                 - screen on shortcut

process:启用或禁用ARP / ICMP / IPv4 / IPv6数据包处理
mpls:启用/禁用在数据包中发送MPLS条目
qinq:启用/禁用在数据包中发送Q-in-Q标头
gre:启用/禁用GRE支持
gre_eth:启用/禁用以太网帧负载GRE支持
vlan:启用/禁用VLAN标记
garp:启用或禁用免费ARP数据包处理
random:启用/禁用随机数据包支持
latency:启用/禁用延迟测试
pcap:启用或禁用在端口列表上发送pcap数据包
blink:启用或禁用端口上的LED闪烁
rx_tap:启用/禁用RX Tap支持
tx_tap:启用/禁用TX Tap支持
icmp:启用/禁用发送ICMP数据包
range:启用或禁用给定的端口列表以发送一定范围的数据包
capture:在端口列表上启用/禁用数据包捕获
bonding:在绑定设备中启用或禁用发送0内容数据包
short:允许发送短于64字节的帧
vxlan:启用或禁用发送VxLAN数据包
screen:启用/禁用更新屏幕和解锁/锁定窗口
mac_from_arp:启用/禁用ARP数据包中的MAC地址
off:屏幕关闭快捷方式
on:屏幕开启快捷方式

set  主要用于设置端口的信息
note: <portlist> - a list of ports (no spaces) e.g. 2,4,6-9,12 or the word 'all'
set <portlist> count <value>       - number of packets to transmit
set <portlist> size <value>        - size of the packet to transmit
set <portlist> rate <percent>      - Packet rate in percentage
set <portlist> burst <value>       - number of packets in a burst
set <portlist> tx_cycles <value>   - DEBUG to set the number of cycles per TX burst
set <portlist> sport <value>       - Source port number for TCP
set <portlist> dport <value>       - Destination port number for TCP
set <portlist> seq_cnt|seqcnt|seqCnt <value>
                                   - Set the number of packet in the sequence to send [0-16]
set <portlist> prime <value>       - Set the number of packets to send on prime command
set <portlist> dump <value>        - Dump the next N received packets to the screen
set <portlist> vlan <value>        - Set the VLAN ID value for the portlist
set <portlist> jitter <value>      - Set the jitter threshold in micro-seconds
set <portlist> src|dst mac <addr>  - Set MAC addresses 00:11:22:33:44:55 or 0011:2233:4455 format
set <portlist> type ipv4|ipv6|vlan|arp - Set the packet type to IPv4 or IPv6 or VLAN
set <portlist> proto udp|tcp|icmp  - Set the packet protocol to UDP or TCP or ICMP per port
set <portlist> pattern <type>      - Set the fill pattern type
                 type - abc        - Default pattern of abc string
                        none       - No fill pattern, maybe random data
                        zero       - Fill of zero bytes
                        user       - User supplied string of max 16 bytes
set <portlist> user pattern <string> - A 16 byte string, must set 'pattern user' command
set <portlist> [src|dst] ip ipaddr - Set IP addresses, Source must include network mask e.g. 10.1.2.3/24
set <portlist> qinqids <id1> <id2> - Set the Q-in-Q ID's for the portlist
set <portlist> rnd <idx> <off> <mask> - Set random mask for all transmitted packets from portlist
    idx: random mask index slot
    off: offset in bytes to apply mask value
    mask: up to 32 bit long mask specification (empty to disable):
          0: bit will be 0
          1: bit will be 1
          .: bit will be ignored (original value is retained)
          X: bit will get random value
set <portlist> cos <value>         - Set the CoS value for the portlist
set <portlist> tos <value>         - Set the ToS value for the portlist
set <portlist> vxlan <flags> <group id> <vxlan_id> - Set the vxlan values
set ports_per_page <value>         - Set ports per page value 1 - 6

set <portlist> count <value>:发送报文数量
set <portlist> size <value>:发送报文大小
set <portlist> rate <percent>:发送报文速率百分比
set <portlist> burst <value>:批量收发报文数量
set <portlist> tx_cycles <value>:调试以设置每个TX突发的周期数
set <portlist> sport <value>:TCP源端口号
set <portlist> dport <value>:TCP目的端口号
set <portlist> seq_cnt|seqcnt|seqCnt <value>:设置发送顺序中的包数[0-16]
set <portlist> prime <value>:设置在prime命令上发送的数据包数量
set <portlist> dump <value>:将接下来的N个接收到的数据包转储到屏幕上
set <portlist> vlan <value>:设置端口列表的VLAN ID值
set <portlist> jitter <value>:设置抖动阈值(以微秒为单位)
set <portlist> src|dst mac <addr>:设置源端口或者目的端口MAC地址00:11:22:33:44:55或0011:2233:4455格式
set <portlist> type ipv4|ipv6|vlan|arp:将数据包类型设置为IPv4或IPv6或VLAN
set <portlist> proto udp|tcp|icmp:将每个端口的数据包协议设置为UDP或TCP或ICMP
set <portlist> pattern <type>:设置填充数据类型
abc:默认填充的数据为字符串abc
none:没有填充模式,可能是随机数据
zero:不填充任何数据
user:用户提供的最大16个字节的字符串
set <portlist> user pattern <string>:一个16字节的字符串,必须在之前设置pattern user命令
set <portlist> [src|dst] ip ipaddr:设置源IP地址或者目的IP地址,格式类似10.1.2.3/24
set <portlist> qinqids <id1> <id2>:设置端口列表的Q-in-Q ID
set <portlist> rnd <idx> <off> <mask>:为端口列表中的所有传输数据包设置随机掩码
idx:随机掩码索引槽
off:以字节为单位的偏移量,以应用掩码值
mask:最长32位长的掩码规范(可禁用):
0:位将为0
1:位将为1
.:位将被忽略(保留原始值)
X:位将获得随机值
set <portlist> cos <value>:设置端口列表的cos值
set <portlist> tos <value>:设置端口列表的tos值
set <portlist> vxlan <flags> <group id> <vxlan_id>:设置vxlan值
set ports_per_page <value>:设置每页端口值1-6

range  主要用于设置包内容的随机数值范围
-- Setup the packet range values --
   note: SMMI = start|min|max|inc (start, minimum, maximum, increment)

range <portlist> src|dst mac <SMMI> <etheraddr> - Set destination/source MAC address
      e.g: range 0 src mac start 00:00:00:00:00:00
           range 0 dst mac max 00:12:34:56:78:90
      or  range 0 src mac 00:00:00:00:00:00 00:00:00:00:00:00 00:12:34:56:78:90 00:00:00:01:01:01
range <portlist> src|dst ip <SMMI> <ipaddr>   - Set source IP start address
      e.g: range 0 dst ip start 0.0.0.0
           range 0 dst ip min 0.0.0.0
           range 0 dst ip max 1.2.3.4
           range 0 dst ip inc 0.0.1.0
       or  range 0 dst ip 0.0.0.0 0.0.0.0 1.2.3.4 0.0.1.0
range <portlist> proto tcp|udp                - Set the IP protocol type
range <portlist> src|dst port <SMMI> <value>  - Set UDP/TCP source/dest port number
       or  range <portlist> src|dst port <start> <min> <max> <inc>
range <portlist> vlan <SMMI> <value>          - Set vlan id start address
      or  range <portlist> vlan <start> <min> <max> <inc>
range <portlist> size <SMMI> <value>          - Set pkt size start address
      or  range <portlist> size <start> <min> <max> <inc>
range <portlist> teid <SMMI> <value>          - Set TEID value
      or  range <portlist> teid <start> <min> <max> <inc>
range <portlist> mpls entry <hex-value>       - Set MPLS entry value
range <portlist> qinq index <val1> <val2>     - Set QinQ index values
range <portlist> gre key <value>              - Set GRE key value
range <portlist> cos <SMMI> <value>           - Set cos value
range <portlist> tos <SMMI> <value>           - Set tos value

对于每一个参数选项,我们都需要设置SMMI,也就是这个参数的起始值、最小值、最大值和增量
range <portlist> src|dst mac <SMMI> <etheraddr>:设置目的或者源MAC地址
一些例子
range 0 src mac start 00:00:00:00:00:00
range 0 dst mac max 00:12:34:56:78:90
range 0 src mac 00:00:00:00:00:00 00:00:00:00:00:00 00:12:34:56:78:90 00:00:00:01:01:01
range <portlist> src|dst ip <SMMI> <ipaddr>:设置目的或者源IP地址
一些例子
range 0 dst ip start 0.0.0.0
range 0 dst ip min 0.0.0.0
range 0 dst ip max 1.2.3.4
range 0 dst ip inc 0.0.1.0
range 0 dst ip 0.0.0.0 0.0.0.0 1.2.3.4 0.0.1.0
range <portlist> proto tcp|udp:设置IP协议类型
range <portlist> src|dst port <SMMI> <value>:设置UDP和TCP的源或目的端口
或者另一种形式range <portlist> src|dst port <start> <min> <max> <inc>
range <portlist> vlan <SMMI> <value>:设置VLAN ID的起始地址
range <portlist> vlan <start> <min> <max> <inc>
range <portlist> size <SMMI> <value>:设置包的大小
range <portlist> size <start> <min> <max> <inc>
range <portlist> teid <SMMI> <value>:设置TEID值
range <portlist> mpls entry <hex-value>:设置MPLS表项值
range <portlist> qinq index <val1> <val2>:设置qinq
range <portlist> gre key <value>:设置gre
range <portlist> cos <SMMI> <value>:设置cos
range <portlist> tos <SMMI> <value>:设置tos
参考地址: